Showing posts with label Tips & Tricks. Show all posts

Saturday, November 11, 2017

NEW Video Tutorials!

The driving force behind my Video Tutorials is customer questions! I have a long list of contact methods on every pattern so that customers can contact me if they need help. One reason for this is simply that I want to help. The other reason is so I know where customers are getting confused! I use customer feedback not only to improve my patterns but also to determine which video tutorial I need to make next!
My "recording studio." I use my painting easel to hold my phone!

So, by popular demand, I give you 3 new Featherby & Friends Crochet Tutorials! These are all related in some way to my most popular pattern, The Mix & Match Lovey, but they are useful for other patterns as well.

Tuesday, October 18, 2016

Attaching Limbs As You Go: Video Tutorial

Are you one of the many individuals who dislikes sewing the arms & legs onto their crocheted dolls & stuffed animals? If so, I have just the technique for you!

I've played around with this technique for a while & there are instructions included in a few of my newer patterns. It is a fast, easy way to attach limbs straight, secure & neat. No more messy stitches, going over an area multiple times (just to be sure) or threading needles!

The instructions included in the patterns are as follows:

1. Pinch top of limb flat, single crochet through stitches on both sides sealing limb shut.

2. Line up the new row of stitches on the limb with the corresponding stitches on the body.

3. Insert your hook through the first stitch on the limb AND through the stitch on the body.

4. Complete a normal single crochet, making sure to pull pieces tightly together.

5. Repeat for each stitch on limb until all stitches are secured.

6. Continue round as directed.


Sounds easy right? If you're still not convinced, I made a video tutorial (with the help of my silly cat, Clementine) showing each step.


Many patterns can be adapted to use this technique, but not all. Here is a list of my own patterns that already include it as part of the instructions:


Although instructions are not included in the patterns it will also work with:


And, only the arms on the Little & Big Sister Dolls. 


Thursday, April 21, 2016

A Few of My Favorite Things

When it comes to crocheting Cute & Cuddly dolls & stuffed animals there are certain tools that make things a little bit easier. Everyone has their own preferences but here are a few of my favorites.


Comfortable Hooks

  1. Clover Soft Touch - These are slightly more economical than some of the other comfort hooks available & they're amazing. I used to have problems with my fingertips getting numb & tingly when I crocheted. Since switching to these hooks I have not had that problem at all.
  2. Clover Amour - These are a little more pricey but if you watch for those lovely 40% or even 50% off coupons they aren't that bad! Unfortunately Soft Touch hooks don't come in the larger sizes so I use Amour for 6.5 mm & up. They are wonderfully comfortable & glide through the yarn effortlessly.

A Variety of Needles

  1. Metal Yarn Needle - This is great for going between stitches. I use it for sewing on limbs of dolls & my smaller stuffed animals. I prefer metal because it is less likely to snag on the stuffing & pull it out through the stitches.
  2. Super Jumbo Tapestry Needle - This needle is essential for sewing on the limbs of my Huggable Buddies. It has a blunt, bent tip & an eye big enough to thread super bulky yarn through. One of these days I'll upgrade to a metal one!
  3. Sharp Tapestry Needle - Unlike my sewing needles, the eyes of my Tapestry needles are big enough to easily thread worsted weight (4) yarn through them. I use these for embroidering noses & mouths & sewing on felt details.
  4. Finishing Needle - The ultimate weaving-in-the-ends tool! Even teeny-tiny ends!

Stitch Marker

  1. Locking Stitch Markers - I love the coil-free safety pin style. I got mine at Stunning String Studio on Etsy. These are great for marking my place, holding pieces together while I sew them & for securing the yarn if I have to put down my project for a time.
  2. Running Stitch Marker - When I'm making parts that are only a few stitches per round it seems to take more time to move my stitch marker than to finish a round. That's when I use a running stitch marker instead. I simply take a scrap of yarn & lay the yarn across where the first stitch of the round will go. Then, I make the first stitch over the scrap of yarn & continue with the round as usual. When I get back to the beginning, I flip the end of the same scrap of yarn over the first stitch of the previous round & then make the first stitch of the next round. Continuing to flip the yarn over the top of the piece marks where each round begins. Not only does this keep track of the first stitch of the current round but every single round before it. This way I can really see how straight my seam is (or isn't) & more easily count how many rounds I've completed if I lose track.

Very Sharp Scissors

These are the sharpest scissors I have ever owned. I only recently bought them so I'm hoping they will stand the test of time & a lot of use! Usually any reasonably sharp pair is good enough, but when it comes to making & trimming doll hair a seriously sharp pair saves me a lot of frustration!


Having the proper tools can save you headaches & make projects more enjoyable! And most of the time they don't even cost very much. If you're having a hard time with a certain step (say attaching the limbs) consider upgrading your tool (try switching from plastic to metal) & see if that helps!

Do you have a favorite tool that helps projects go more smoothly?

Visit me on Facebook for pictures, patterns & more!

Wednesday, April 13, 2016

How to Create a Ravelry Project


Creating a Project on Ravelry


Step One: Find the pattern you used

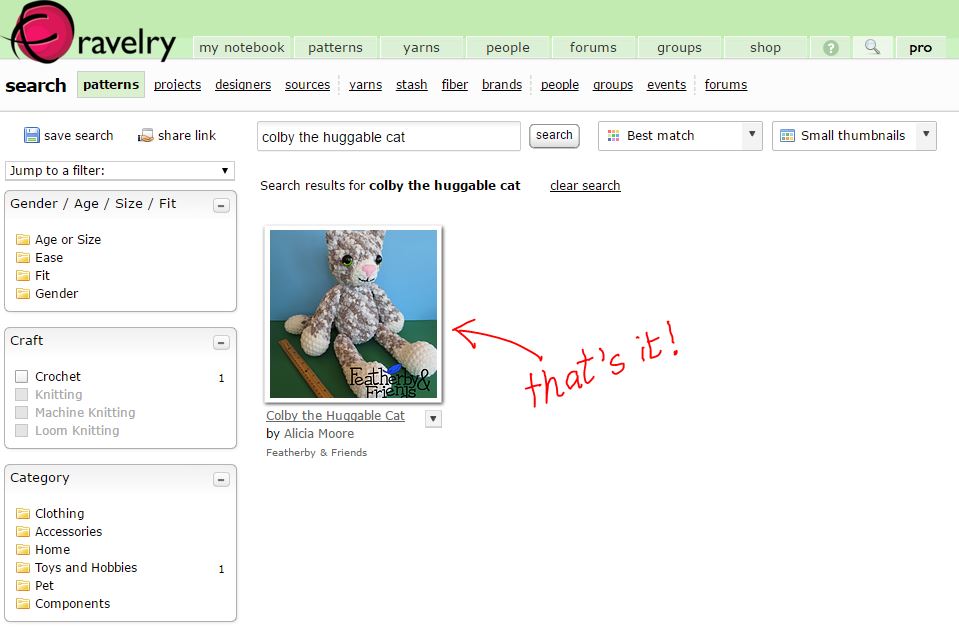
When you open Ravelry, click on "Patterns" at the top. Next type in the name of the pattern or designer, and finally click search.

If your pattern appears right away, great! Click on it & move on. If not, use the criteria on the left to narrow it down.


Step Two: Hook it! (or if you're knitting, Cast on!)

Click on "hook it" with the little crochet hook next to it.


A box will open where you can type in the name of your project (i.e. Alicia's Cat), then click "Create this Project."


Step Three: Add lots of details!

In order to edit your project you have to click "edit project" or that tiny little pencil. Doing so will open up a new page with tabs you can type in, stars you can click & much more!


Here's where the fun begins!

1. Make sure you click the face that best represents your feelings about the project!
2. Fill in your rating for the pattern & the difficulty
3. Make lots of detailed notes!

Also... adding the hook & yarn you used is especially important if you used something other than what the designer recommended. Make sure you say why you switched in your notes & how well it worked.

There are many other fields you can fill in too but you don't have to do them all to save your project.


Make sure you save all of your changes...


Step Four: Adding Pictures

Click where it says "Add Photos." (see #4 in the previous picture) A new page will open that looks like this:
 
1. It should automatically look like this but if it doesn't click on "upload from computer." Unless you want to use one of the other methods then click on those.

2. Click on "Choose Files" & find the file(s) you want to use. You can choose more than one at once by holding down the Ctrl key.

3. Click "upload" then be patient. As long as you chose files that are a reasonable size it won't take long for a list of files to show up on the screen along with progress bars. When they finish uploading they should appear on the screen like this:


Note that sometimes the pictures don't appear right away. Instead of trying to upload again wait a minute & then refresh the page.

Next, you can either click on "upload from computer" again & add more pictures, or click on "details" to go back to the main project page.


Step Five: Share your Project!

After clicking on "details" you'll be back at the main project page. It should show your pictures & all of the details you entered.
At the top right click on "Share This." Then you can choose to send it to someone on Ravelry or to "Share this page with others..."
If you chose to "Share this page with others" you will be given two more options. You can make it public for all to see or click on "Invite - access with link" for even more options.
If you chose the "Invite" option you'll see a box like the one below. Just copy & paste the link to share it with any one you choose or use Facebook, Twitter or Pinterest to do your sharing.


The Finished Project

When you're finished, you'll have a concise summary of your project. If you're thorough other people can use it to help decide if they want to make their own & the designer can get an idea of how well the pattern is working! 

I hope this guide was helpful! Next time you're looking for a new pattern remember to check out the projects people have posted. It could help you find your new favorite pattern!

Visit me on Facebook for more information, patterns & more!

See my Colby project here!

Please check out my Ravelry Store & create projects for any of my designs you have made!